Before the rebuild:
First I looked at new trailers to buy and quickly decided that the size and money were not going to work for me. I want a usable trailer and a small trailer wasn't going to cut it. Harbor freight has a great trailer and you can find many articles on how to build one using their frame. I opted for rebuilding my Coleman.
I studied Stan's build and then started taking the pumpkin apart. The huge plastic pumpkin is held in place by 4 bolts that had to be cut out.
Once I removed the orange shell my son and I sanded the frame to bare metal and repainted it a gloss black over the top of a black primer. I wish I had taken pictures of this step but I didn't.
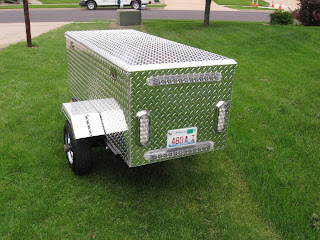
Next I found a Diamond Plate tool box. It was 2' x 4' x 5'. It came with gas shocks and 2 locks for securing everything inside. It also is sealed with a rubber seal to keep water out.
Next we started putting on some LED lights from Ebay. Led's work well with the motorcycle due to the low current draw. The regular lights on the Coleman caused me to have to reset the security system every time I disconnected the trailer. With the LED lights all is good.
I chose to do all of this work with the trailer was on saw horses to save our back. Make sure you test all lights before installing them. Mine all worked great.
Next we mounted the box on the freshly painted frame. I did separate the box from the frame with small rubber padding to keep from scratching the frame and later rusting. it is bolted down in 4 places and is very secure.
 The fenders are also available on Ebay (what can't you find on Ebay). The Chrome wheels came from Habor Freight.
I also added two yellow marker lights, one on each side and a simple bicycle stand to the tongue to keep it and the 6 way plug off the ground.
The lights are turn/stop/running only. They are not 4 way left or right turn/ stop/running. I couldn't find those shorter than 48 inches and they run four times the price. So I hooked the top and bottom as running and brake and the ovals as running and turn lights. Plenty of light back here.
To light the trailer I bought LED trailer bolts that hold the plate on and also light the plate.
The interior was covered with car carpet and glued into place. The bottom is held in with Velcro for easy cleaning and the back piece also is Velcroed for easy access to the wiring.
I added lights to the lid that rotate for plenty of light when looking for items in the dark while camping or on the road at night.
The finished product pulls like a dream.

Building it with my son, priceless!
Trailer upgrade looks great and is along way from the pumpkin and still holds enough stuff for four campers. Another side benefit was the pumpkin reflected a lot of sound from my exhaust back to the rider and passenger. The new trailer doesn't and is also a little narrower so I like pulling it even better.


